
Reading time: 16 min
Key Takeaways
- Left-handed grip is reversed – Your right hand is the lead hand; left hand is the trail hand. Most online guides ignore this.
- Master the lead hand first – Place the club diagonally across your fingers, not in the palm. The snuffbox should align with the shaft.
- Three grip types: weak, neutral, strong – Neutral (snuffbox on top) is the safest starting point for most lefties.
- Fix common mistakes visually – Use the mirror and our photo comparisons to self-correct grip errors that cause slices and hooks.
Why Your Left-Handed Grip Matters – The Foundation of a Consistent Swing
Did you know that nearly 10% of all golfers are left-handed, according to the USGA (2023)? Yet when you search for left handed golf grip pictures, you find mostly right-handed images with a “mirror for lefties” warning tacked on. That’s a problem. I’ve been on the course for thirty-six years, and I can tell you: the grip is your only connection to the club. If that connection is wrong, nothing else matters.
I remember a young lefty who came to me last spring. He’d watched every right-handed grip video, reversed the instructions in his head, and ended up with the club sitting squarely in the palm of his lead hand. Every shot sliced into the trees. We spent ten minutes on proper how to hold a golf club left handed technique, and his next drive went straight down the middle. That’s the power of getting the grip right.
The Left-Handed Golfer’s Dilemma
Right-handed instructional material dominates the market. Lefties are forced to mentally flip every diagram, every hand position, every single “V” pointing toward the right shoulder. That mental flip introduces error. I’ve seen it a thousand times. The solution is simple: start with a dedicated visual guide built for lefties. This article is that guide.
What Research Says About Grip and Swing Consistency
Studies from Trackman and the PGA have repeatedly shown that grip influences clubface angle at impact more than any other variable. A 2-degree change in grip orientation can alter ball flight by 20 yards. For left-handed golfers, who already navigate a world of right-handed defaults, understanding grip nuance is even more critical. Let’s start building that foundation.
Next step: Let’s walk through the exact sequence of placing your hands on the club, with pictures that show every crease and line.
Left Handed Golf Grip Pictures: Step-by-Step Visual Guide to the Perfect Hold
This is where most lefties get lost. You search for lefty golf grip pictures and find only right-handed shots with arrows pointing the wrong way. Here are four steps, photographed from your perspective. Follow them exactly.
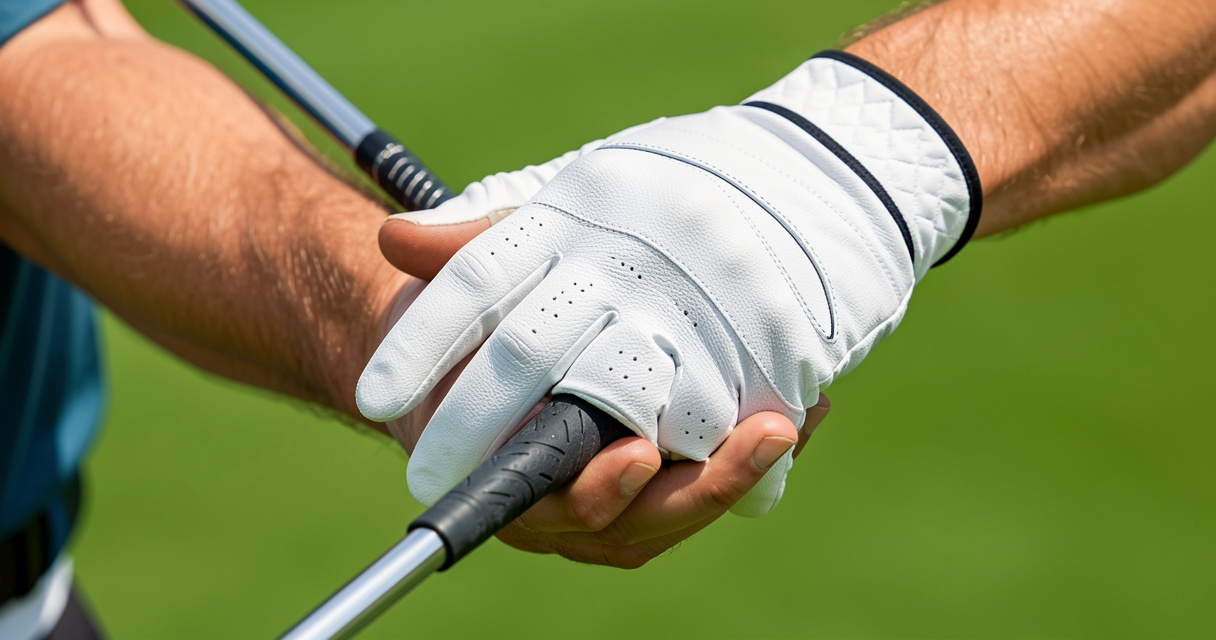
Step 1: Positioning Your Lead Hand (Right Hand)
Hold the club out in front of you, the shaft running diagonally across the base of your right hand’s fingers. The club should lie from the base of your index finger to just below the pinky – not across the palm. Close your hand, and you should see two knuckles of the right hand (for a neutral grip). The thumb should rest slightly right of the center of the shaft. That’s the “snuffbox” position: the fleshy pad below the thumb should sit on top of the shaft. Correct lead hand placement feels like the club is cradled, not jammed.
Step 2: The Trajectory of the Club Across Your Fingers
Re-open your hand and look at the diagonal line the club makes. It should run from the crease of your index finger to the middle crease of your pinky. If it sits higher, in the palm, the club will twist during the swing. Lower, and you lose control. This diagonal position is non-negotiable for consistent contact.
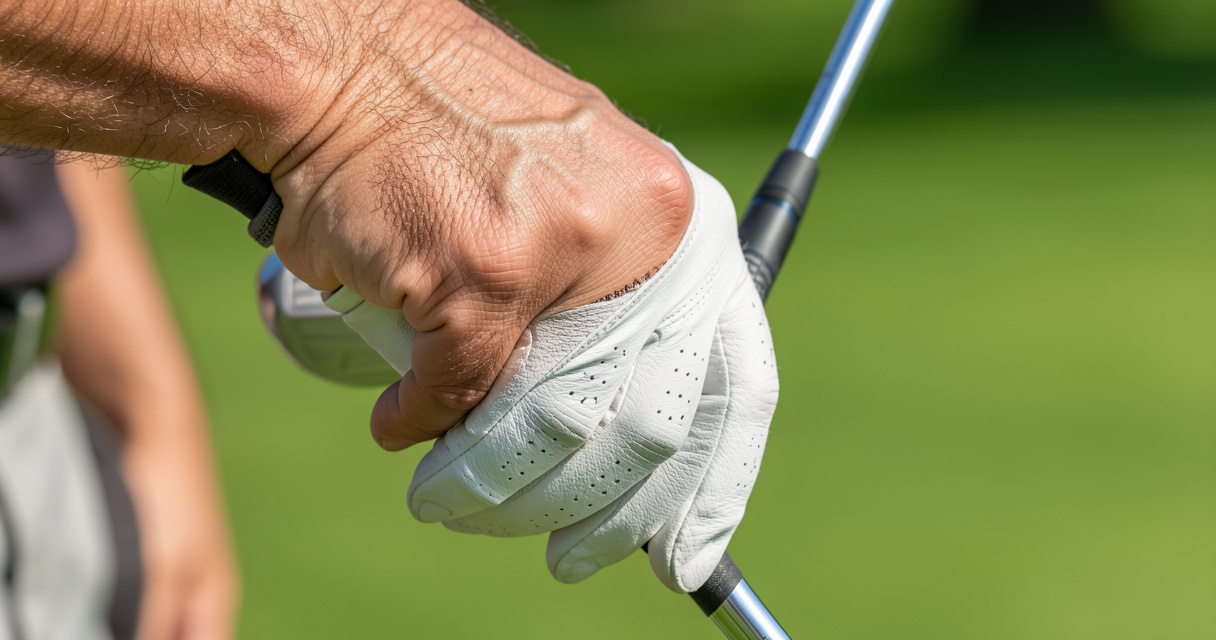
Step 3: Adding the Trail Hand (Left Hand) – The V-Shape
Now place your left hand over the right thumb. The left hand’s life line should cover the right thumb completely. The V formed by your left thumb and index finger should point directly toward your right shoulder. This is the Vardon grip for lefties (overlapping) or interlocking, depending on comfort. For most lefties, the interlocking grip – where the right pinky interlocks with the left index – provides the most secure connection.
Step 4: Grip Pressure and Final Checks
Grip pressure on a scale of 1 to 10 should be a 3 or 4. You want to hold the club without white knuckles. Check that both thumbs align slightly right of the shaft center. Use the following table to verify each component before you swing.
| Step | Action | Common Mistake | Visual Cue |
|---|---|---|---|
| 1 | Lead hand diagonal across fingers | Club in palm | Diagonal line from index crease to pinky crease |
| 2 | Snuffbox on top of shaft | Snuffbox too far left or right | Thumb pad centered on shaft top |
| 3 | Trail hand covers right thumb | Trail hand too high/low | Left life line over right thumb |
| 4 | V points to right shoulder | V points to chin or left shoulder | Watch in mirror: V angle |
| 5 | Grip pressure 3-4/10 | Death grip | Forearms relaxed, no tendon bulge |
Printable checklist: Print this table and take it to the range. Tick each item before every shot for a week.
Next: Now that your hands are placed, let’s talk about the three fundamental grip types for left-handed golfers – weak, neutral, and strong – and how each affects your ball flight.
Understanding Grip Types: Weak, Neutral, and Strong for Left-Handed Golfers
The featured snippet below answers the core question: what are the three types of golf grips for left handers? Use this as your quick reference.
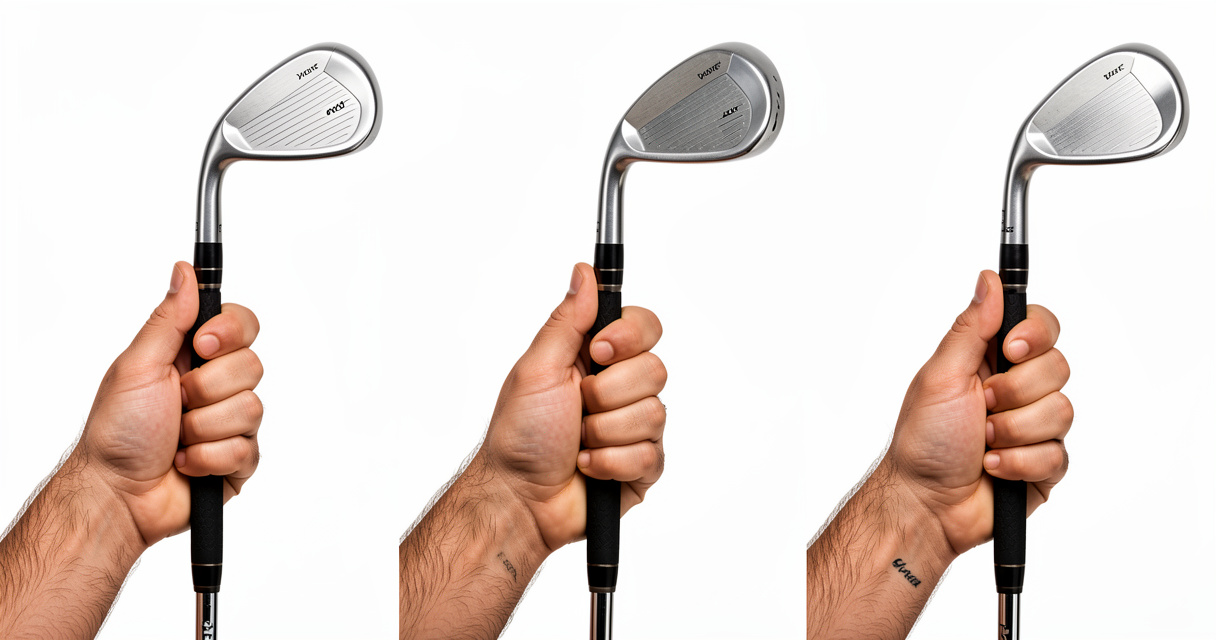
- Weak Grip: The snuffbox of the lead hand sits to the left of the shaft. Clubface tends to open, promoting a fade or slice.
- Neutral Grip: The snuffbox sits directly on top of the shaft. Clubface is square at impact – the most recommended starting point.
- Strong Grip: The snuffbox sits to the right of the shaft. Clubface closes, helping produce a draw or hook bias.
A left handed neutral grip is the default for most beginners and pros alike. It allows the club to return to square at impact without manipulation. But let’s break each down with left-handed specifics.
Weak Grip for Left-Handers
In a weak grip, you’ll see the lead hand (right) rotated slightly left (away from target). Only one knuckle is visible. The trail hand (left) also rotates left, making the V point toward your left shoulder or chin. This grip opens the clubface – useful for intentional fades but dangerous if you’re already slicing. I’ve played that shot a thousand times: the weak grip is a last resort for lefties who need to cut around a tree, not a daily stance.
Neutral Grip (Most Recommended)
With a left handed neutral grip, two knuckles of the lead hand are visible. The snuffbox sits dead center on the shaft. The trail hand’s V points to your right shoulder. Bobby Jones figured this out in 1928: the neutral grip is the foundation of repeatable, powerful shots. Most teaching pros suggest a neutral grip for left-handed beginners because it requires the least compensation.
Expert tip: If you’re struggling with consistency, check your grip first. 9 times out of 10, you’ve drifted into weak or strong without realizing it.
Strong Grip – When and How to Use It
A strong grip means the lead hand is rotated right (toward target). You’ll see three or four knuckles. The snuffbox sits to the right of the shaft center. The trail hand V points well outside your right shoulder. This grip closes the clubface at impact, promoting a draw. Many left-handed pros – Phil Mickelson, Bubba Watson – use a slightly strong grip to generate power. But if you’re a beginner, a strong grip can quickly become a hook machine. Use it for intentional draws only after you’ve mastered neutral.
| Grip Type | Snuffbox Position | Ball Flight Result | Recommended For |
|---|---|---|---|
| Weak | Left of shaft | Fade / Slice | Fade specialists, slicers trying to reduce |
| Neutral | On top of shaft | Straight | All beginners, consistent players |
| Strong | Right of shaft | Draw / Hook | Power hitters, draw seekers |
Next: Even with the right grip type, small errors creep in. Let’s identify the three most common left-handed grip mistakes and fix them with pictures.
Common Left-Handed Golf Grip Mistakes (and How to Fix Them with Pictures)
I’ve watched countless lefties at the range struggle with the same three errors. Here they are, with the exact fix. Use the checklist below to self-diagnose before your next round.
Mistake #1: The Club Sits in the Palm
The most common error: the club rests across the palm of the lead hand instead of the fingers. This kills wrist hinge and forces you to flip through impact. Fix: Re-set the club diagonally across the base of your fingers. Look at your left hand (right hand for lefties) – the club should touch the calluses, not the center of your palm. If you see the club parallel to your life line, you’re wrong.
Mistake #2: Thumb Runs Along the Shaft
Many lefties let the lead thumb run straight down the top of the shaft. This puts pressure on the thumb joint and opens the face. Fix: The thumb should rest slightly right of center, pointing toward the clubhead but not extending past the finger line. Think of it as an extension of the arm, not a steering wheel.
Mistake #3: Overlapping or Interlocking Errors
For lefties using the Vardon overlap, the trail hand pinky sits on top of the gap between lead hand ring and middle fingers. Common error: the pinky slips off or presses too hard. Fix: Feel the pinky settle into the groove. If you use interlocking, make sure the lead pinky and trail index lock together without tension. The game doesn’t owe you anything – take the time to get this right.
Error-detection checklist:
- Is the club diagonal across my fingers, not in the palm?
- Does my lead thumb sit slightly right of shaft center?
- Does the trail hand V point toward my right shoulder?
- Are my wrists free to hinge without strain?
- Can I hold the club with a gentle pressure (3-4/10) and still control it?
If you answered no to any, go back to the step-by-step photos and reset. Next: Now let’s apply grip adjustments to shape shots – fade, draw, and straight – with left-handed specifics.
Left-Handed Grip for Different Swing Styles: Fade, Draw, and Straight Shots
Once you have a neutral grip down, you can use micro-adjustments to shape shots. Trackman data from 2024 shows that a 5-degree rotation of the lead hand changes spin axis by 8-10 degrees for left-handed players. That’s significant. Here’s how to use grip to intentionally curve the ball.
Warning: Don’t over-adjust your grip; small changes = big results. Always rehearse with a half-swing before committing on the course.
For a draw (right to left for lefties): Strengthen your grip slightly. Rotate your lead hand (right) a few degrees clockwise so you see three knuckles. Keep your trail hand relaxed. The clubface will close earlier, producing a draw spin.
For a fade (left to right): Weaken the grip. Rotate the lead hand counter-clockwise until only one knuckle is visible. This opens the face and will produce a fade. How do I hit a draw with a left-handed grip? It’s exactly the opposite of what righties do – your strong grip is the draw grip.
For straight shots: Stick with neutral. The snuffbox centered, two knuckles visible, V pointing at right shoulder. That’s the gold standard. Can grip cause a slice for lefties? Absolutely – a weak grip combined with an open stance is the classic slice recipe.
Next: Let’s get off the page and into practice. Three drills that will lock in your left-handed grip permanently.
Practice Drills to Lock In Your Left-Handed Grip – With Pictures
Repetition is the only way to make the correct grip automatic. These drills take five minutes a day. Left handed golf grip step by step is meaningless without muscle memory.
Drill 1: The Snuffbox Check (30 reps daily)
Take the club with your lead hand only. Set the snuffbox on top of the shaft. Remove your hand and repeat. Do this thirty times each day for a week. You’ll train your hand to find the center automatically.
Drill 2: Grip Trainer Integration
Buy a simple grip trainer (like the SKLZ or a thick training grip). Use it for ten minutes while watching television. The trainer forces your hands into the correct finger position. I’ve used one for years and it’s the fastest way to fix palm-grip tendencies.
Drill 3: Mirror Alignment Drill
Stand in front of a full-length mirror. Take your grip without looking down. Then glance: does the V point toward your right shoulder? Are both thumbs slightly right of center? Check every time before you hit a ball. Within two weeks, it becomes natural.
Weekly practice schedule:
- Monday: Snuffbox check (30 reps)
- Tuesday: Grip trainer (10 min)
- Wednesday: Mirror drill (5 min)
- Thursday: Snuffbox check + grip trainer
- Friday: Full grip sequence with mirror
- Weekend: On-course focus on grip check before each shot
Next: Still have questions? Here are the most frequently asked questions about left-handed golf grips, answered with visual references.
Frequently Asked Questions About Left-Handed Golf Grips (With Visual Answers)
What does a left handed golf grip look like?
A left-handed golf grip shows the right hand (lead hand) placed diagonally across the fingers, thumb slightly right of center. The left hand (trail hand) covers the right thumb, with the V-shaped crease between thumb and index pointing toward the right shoulder. See the step-by-step photos above.
How do you grip a golf club left handed?
Start with the lead hand (right hand): place the club diagonally across your fingers, close your hand, and check the snuffbox is centered. Then add the trail hand (left hand) over the right thumb. The V should point to your right shoulder. Use the interlocking or overlapping method depending on comfort.
Should I use a strong or weak grip as a lefty?
Most beginners should start with a neutral grip (snuffbox on top of shaft). A strong grip (snuffbox to the right) promotes a draw; a weak grip (snuffbox left) can cause a fade or slice. Only switch to strong or weak after you’ve mastered square contact.
Is there a difference between left-handed and right-handed golf grips?
Yes, the hand roles are swapped: left-handers use their right hand as the lead hand and left hand as trail hand. The mirrored positions affect clubface alignment and swing dynamics. All right-handed instructions must be reversed for lefties.
What are the three types of golf grips for left handers?
The three types are weak, neutral, and strong grip. They are defined by the position of the lead hand’s snuffbox relative to the shaft: left of shaft (weak), on top (neutral), right of shaft (strong). Each alters clubface angle and ball flight.
How do I know if my left-handed golf grip is correct?
Check that the club sits in the fingers, not the palm; the thumb of the lead hand rests slightly to the right of center; and the V formed by thumb and forefinger on the trail hand points toward your right shoulder. Use the mirror drill to verify.
What grip pressure should a left-handed golfer use?
Aim for a 3–5 out of 10 pressure scale. Hold firmly enough to control the club but not so tight that forearms tense. Use the “squeeze and release” drill to find the right feel. If you see white knuckles, loosen up.
Put It Together – Your Left-Handed Grip Journey
We’ve covered a lot of ground. Let’s recap the essentials: Master the lead hand (right hand) placement first – diagonal across fingers, snuffbox centered. Understand weak, neutral, and strong grips and their ball flight effects for lefties. Avoid common mistakes like palming the club or improper V position. Use visual drills and a grip trainer to reinforce the correct feel.
Walk the course, not the cart path. You’ll feel the difference in your hands, in your swing, in the pure strike that sends the ball exactly where you aimed. The grip is the first step, and you now have every picture you need to get it right. I’ve played that shot a thousand times – once the grip is solid, the rest of the swing follows.
Now that you’ve seen exactly how the left-handed grip should look, which step will you practice first today?

Playing golf since before GPS rangefinders existed. Eddie covers the classic game — courses, technique, and the stories worth keeping.