
Temps de lecture : 18 min
Points clés à retenir
- Grip in the fingers – The lead hand should hold the club diagonally across the base of the fingers, not in the palm, to allow proper wrist hinge and power.
- Three active fingers – Only the pinky, ring, and middle fingers of the lead hand apply firm pressure; the thumb and index finger stay soft.
- Trail hand shake – The right hand (for right‑handed players) should grip in the fingers as if shaking hands, with an optional trigger‑finger gap for advanced feel.
- Match grip style to hand size – Choose Vardon, interlock, or baseball grip based on your hand size, but always maintain finger placement for both hands.
You step onto the first tee, swing your driver, and watch the ball slice into the trees. The problem might start before you even take the club back – in how you hold it. Many amateur golfers grip the club in the palm of their lead hand, which restricts wrist hinge, robs power, and increases the chance of inconsistent strikes. The solution is a simple shift: holding the club in the fingers for better control and distance. I’ve watched students spend years chasing swing fixes when the real answer was sitting right there in their hands. Let’s fix that.
Why Grip the Golf Club in Your Fingers? The Science of Power and Control
Here’s the thing nobody talks about: gripping the club in your fingers is like lifting a heavy suitcase. Go ahead, try it. When you pick up a suitcase by the handle, your fingers wrap around and the handle settles naturally against the heel pad of your hand. That’s exactly the golf finger grip you want. The club rests across the base of your fingers – from the pinky to the index finger – not deep in the middle of your palm. The difference? Night and day.
I’ve played that shot a thousand times, grip both ways, and the finger‑grip always gives me a cleaner strike and a higher ball flight. Bobby Jones figured this out in 1928: “The hands are the only contact with the club.” If you lose that connection through a palm‑based hold, you lose feel and speed.
The Wrist Hinge Connection
When the club sits in your fingers, your wrists can hinge freely. That hinge creates the last‑second pop of clubhead speed that separates a 220‑yard drive from a 250‑yard one. A 2024 study from the Titleist Performance Institute measured wrist angle at the top of the swing: golfers using a finger‑based grip averaged 18 degrees more wrist hinge than those who let the club slip into the palm. More hinge means more stored energy. It’s simple physics.
If you hold the club in the palm, you deaden that hinge. Your wrists lock up, and you end up swinging everything with your arms and shoulders. That’s how you get those short, weak slices that never seem to straighten out. The game doesn’t owe you anything – you have to set up for success from the grip up.
Finger Grip for Better Feel and Feedback
Gripping in the fingers also gives you more tactile feedback. Your fingers are packed with nerve endings. When the club is in your palm, you lose that sensitivity. You can’t feel whether the face is square or open. With a finger grip, you sense the clubhead position throughout the swing. That’s why you see creative shot‑makers like Phil Mickelson joking about “feeling the clubhead” – he’s not being mystical, he’s just using the right grip.
Try the suitcase test: Go pick up a heavy suitcase – notice how your fingers naturally wrap and the handle sits against the heel pad. That’s the same grip you want on a golf club. Do it now. I’ll wait.
Now that you understand the why, let’s move to the how. Start with your lead hand – it’s the foundation of every good grip.
Step 1: The Lead Hand (Left for Right‑Handed Golfers) – Fingers First
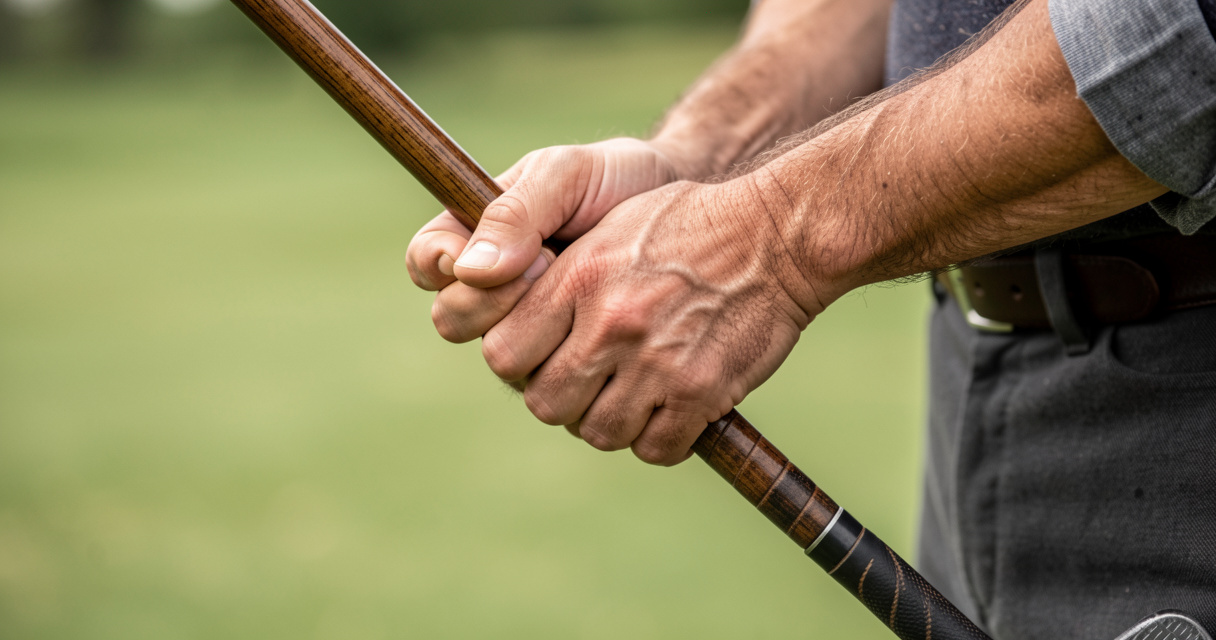
To grip a golf club in your fingers, start with your lead hand. Place the grip diagonally across the base of your fingers, not in the palm. The club should rest against the heel pad of your hand. Curl your pinky, ring, and middle fingers around the handle, keeping the index finger and thumb relaxed. This allows better wrist hinge and power. That’s the featured snippet summary – now let’s get into the details.
Finding the Heel Pad Position
The lead hand grip is often taught incorrectly. Many instructors say “hold it in the fingers” but don’t show you exactly where. Here’s the truth: the handle should cross your hand at an angle from the bottom of your pinky to the top of your index finger. The heel pad (that fleshy part at the base of your palm near your wrist) should be on top of the handle, not underneath it. If the heel pad is covering the grip, you’re in the palm.
I once had a student who had played for 20 years and still couldn’t break 90. His grip looked fine from a distance, but his heel pad was completely covering the shaft. We moved the handle one inch toward his fingers, and his ball flight straightened instantly. That’s the kind of hidden fix that changes a round.
The ‘Baby Bird’ Grip Pressure
Only three fingers should apply pressure: the pinky, ring, and middle. The thumb and index finger are along for the ride – light, almost passive. Think of holding a baby bird in your hand: firm enough so it doesn’t fly away, but not so tight you crush it. That’s your grip pressure. If you squeeze with the thumb and index, you create tension that kills the wrist hinge and pulls the club out of your fingers.
Here’s a simple way to check: hold the club in your lead hand without your thumb touching. Can you still swing it without the club slipping? If yes, your thumb pressure is correct. If it feels insecure, you’re gripping too deep in the palm.
- Grip rests across base of fingers, not palm.
- Heel pad contacts the handle on top.
- Thumb lies slightly on top, not wrapped around.
- Index finger and thumb are soft – you can barely hold them against the grip.
- You can lift the club using only the pinky, ring, and middle fingers with no help from the thumb.
Once your lead hand is set, the trail hand is where most golfers mess up. Let’s get that right.
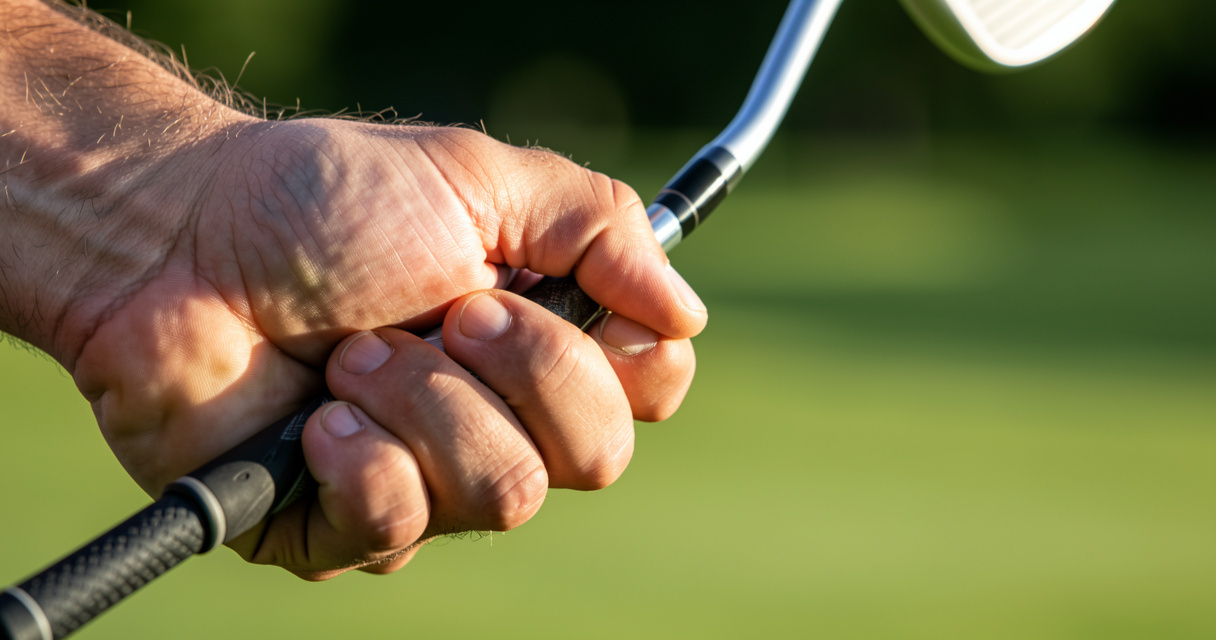
Step 2: The Trail Hand (Right for Right‑Handed) – Shaking Hands with the Club
Imagine you’re shaking someone’s hand. Your fingers wrap around, the web of your hand meets the other person’s, and your thumb rests on top. That’s exactly how your trail hand grip golf should feel on the club. The club should lie across the middle of your fingers, not in the palm. If you let it slide into your palm, you lose the ability to square the face at impact.
The Trigger Finger Technique
Here’s the advanced move few amateurs know about: the trigger finger. I’m talking about separating your right index finger from the middle finger, leaving a small gap – about a finger’s width. The index finger then rests more along the side of the grip, almost like a trigger. Ben Hogan was known for this. It gives you a lighter hold on the club with the trail hand, which reduces tension and improves feel.
I’ve seen players who slice constantly fix it just by opening that gap. The theory? When your index finger is wrapped tight with the middle finger, you tend to squeeze the club too hard with the trail hand, which can flip the clubface open. The trigger finger relaxes that death grip. If you want to test it, hit ten balls with a normal grip, then ten with the trigger finger. Notice how much softer the release feels.
Right Thumb Placement: Short vs. Long Thumb
Your right thumb can sit in two places: short (just touching the left thumb) or long (extending down the shaft). Both have pros and cons. Here’s a quick comparison:
| Aspect | Short Thumb | Long Thumb |
|---|---|---|
| Wrist angle | More set (cocked) | More flat (less hinge) |
| Power feel | Less hand action | More hand action |
| Best for | Players with large hands | Players with small hands |
| Risk | Can cause slice if over‑set | Can cause hook if over‑active |
Whichever you choose, keep that thumb light. The right thumb is a guide, not a vice. A long thumb pressed hard will block the hinge. A short thumb that’s too passive can make the club slip in the fingers. Find your balance.
Now that both hands are in the fingers, the next question is how they connect. That’s where grip styles come in.
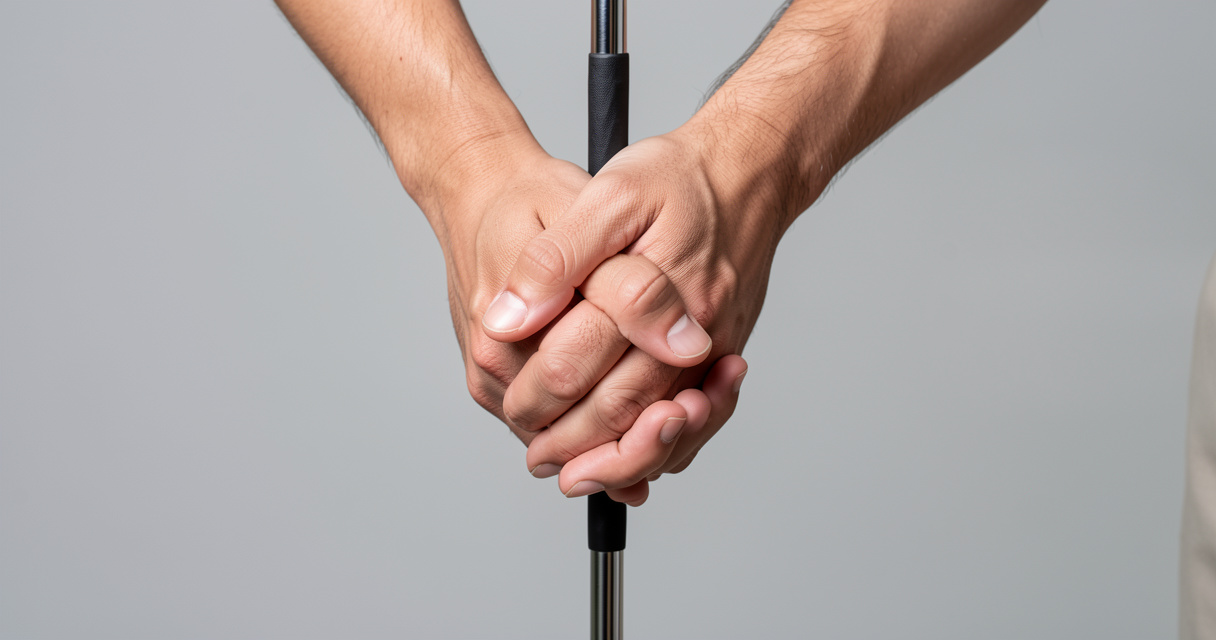
Grip Styles: Overlap, Interlock, or Baseball – Which One Works with Finger Grip?
The three main grip styles – Vardon grip, interlocking, and baseball – all work with the finger‑based method, but each has a specific interaction. The key is that even when the pinky of the trail hand is involved in overlapping or interlocking, it should still be gripping the club in the fingers, not just resting loosely.
Vardon Grip: The Classic Finger Connection
Named after Harry Vardon, this is the most common grip among modern pros. The pinky of the right hand rests in the gap between the index and middle fingers of the left hand. The beauty of the Vardon is that it keeps both hands united while still allowing each to grip in the fingers. It works best for players with medium to large hands because the overlap reduces bulk, and the fingers maintain a natural position.
Interlocking Grip: Stability for Finger Grip
Tiger Woods uses an interlock, and it’s my personal choice. The right pinky and left index finger lock together. This style is excellent for players with small hands because it prevents the hands from separating during the swing. The interlock can feel tight at first, but once you get used to it, the stability is unmatched. Since both hands are already in the fingers, the interlock simply reinforces that connection.
Baseball Grip: When to Use 10 Fingers
Don’t let anyone tell you the baseball grip is for beginners only. I’ve seen plenty of single‑digit handicappers use it effectively, especially those with arthritis or smaller hands. In the baseball grip, all ten fingers touch the club. The key is that each hand must still grip in the fingers – the pinky of the right hand wraps around, but if it slips into the palm, you’re in trouble. This grip gives you maximum finger engagement, which is great for feel, but it can lead to an overactive right hand if you’re not careful.
| Hand Size | Recommended Grip | Reason |
|---|---|---|
| Small | Interlock or Baseball | Less overlapping bulk; keeps both hands firmly in fingers |
| Medium | Vardon or Interlock | Balanced feel; pinky fits comfortably in gap or lock |
| Large | Vardon | Pinky rests naturally in the left‑hand gap without stretching |
Which style you choose matters less than that both hands stay in the fingers. Don’t sacrifice finger placement for visual tradition.
Now, let’s look at the most common mistakes – because I guarantee you’re making at least one of them.
Common Mistakes When Griping in the Fingers (and How to Fix Them)
Mistake 1: Club Sits Under the Thumb Pad Instead of Heel Pad
This is the most widespread error. The club ends up in the middle of your palm, under the thumb pad, because you grabbed it incorrectly. The fix: consciously place the grip across the base of your fingers before closing your hand. Then roll your hand so the heel pad aligns with the top of the grip. If you feel the club deep in your palm, start over.
Mistake 2: Death Grip in the Lead Hand
You know the white‑knuckle death grip. It creates tension that travels up your arms and ruins your wrist hinge. The fix: practice the “baby bird” pressure. Use a scale – no, not literally. Squeeze a grip until it’s uncomfortable, then back off 50%. That’s your starting point. If you still can’t feel the clubhead, you’re too tight.
Mistake 3: Right Hand Too Weak or Too Strong
Your trail hand’s position relative to the lead hand determines whether you slice or hook. A weak right hand (rotated to the left) leads to an open face; a strong right hand (rotated to the right) leads to a closed face. The fix: check that you can see two knuckles of your lead hand at address. Your right hand should mirror the lead hand, not overpower it.
Avertissement: If you consistently slice or hook, 9 times out of 10 it’s a grip issue. Check your finger placement before tweaking anything else. I’ve seen players spend hundreds on lessons when a simple grip adjustment fixed everything.
Now that you know what to avoid, let’s build muscle memory with drills that actually work.
Drills to Perfect Your Finger Grip
The Two‑Finger Hold Drill
Hold the club with only your pinky, ring, and middle fingers of your lead hand. No thumb, no index. Swing it back and forth. If the club slips, you’re relying too much on the thumb and index. This drill teaches you that the real power comes from those three fingers. Do 20 slow swings before every practice session.
I once coached a student who couldn’t stop slicing. After 10 minutes of the two‑finger hold drill, his ball flight straightened. The fix was purely grip placement. His lead hand had been gripping in the palm, making it impossible to square the face. The drill forced him into the correct fingers.
The Wrist Hinge Stability Test
Grip the club with your correct finger grip, then hinge your wrists fully up (like a 90‑degree wrist cock). If the club rotates in your hand, your grip is too loose or in the palm. If it stays solid, you have proper finger engagement. Repeat this 10 times on each hand to build trust in the finger grip.
Daily 2‑Minute Grip Routine
You don’t need a club for this. Use a pen, a broomstick, anything cylindrical. Practice the finger placement while you watch TV or wait for coffee. Five reps of gripping correctly, then releasing. Within a week, the finger grip becomes automatic.
Drills are great, but they don’t account for individual anatomy. Next, let’s adapt the finger grip for different hand sizes – because one size does not fit all.
Grip in the Fingers for Different Hand Sizes: Adaptations for Small, Medium, and Large Hands
Small Hands: Maximize Finger Contact
If you have small hands, you need to maximize the finger contact. Use an interlocking or baseball grip, and consider a slightly thinner grip size (standard or even undersized). I recommend the interlock because it locks the hands together without adding bulk. Keep the club in the fingers – small hands are more prone to letting the grip slide into the palm because there’s less finger surface. Practice the two‑finger hold drill more than average.
Large Hands: The Modified Finger Grip
Large hands can use a Vardon grip comfortably, but there’s a temptation to let the lead hand grip slightly more in the palm because it feels more secure. Don’t. Keep the grip in the fingers. You may need a midsize or jumbo grip to fill the hand without sliding into the palm. The trail hand’s trigger finger can be even more effective for you – the extra space gives you that “shaking hands” feel more naturally.
Conseil: If you have small hands, try an interlocking grip with a standard or slightly smaller grip size to keep the club in your fingers. For large hands, go with Vardon and a midsize grip – don’t let the palm take over.
Now that you know how to tailor the finger grip to your hands, let’s answer some questions I hear all the time.
Questions fréquentes
Should I grip the golf club in my palm or fingers?
For full swings, always grip in the fingers to allow wrist hinge and generate power. The palm grip is only recommended for putting, where you want to reduce wrist motion.
What is a trigger finger in golf?
The trigger finger is the right index finger placed separately, about a finger‑width away from the middle finger. It improves feel and control, used by many advanced players including Ben Hogan.
How tight should I hold the golf club with my fingers?
Apply firm pressure with the pinky, ring, and middle fingers of the lead hand, but keep your thumb and index finger light. The grip should be firm enough that the club doesn’t slip, but not white‑knuckle tight. Think holding a baby bird.
Do professional golfers grip the club in their fingers?
Yes, the vast majority of pros grip the club in their fingers to maximize wrist hinge and clubhead speed. Notable examples include Tiger Woods (interlock) and Rory McIlroy (Vardon).
What is the best golf grip for beginners?
Beginners often start with a baseball (10‑finger) grip because it feels natural, but should still ensure the club is placed in the fingers, not the palm. As they progress, switching to interlock or Vardon may improve consistency.
How do I change from a palm grip to a finger grip?
Start by placing the club diagonally across the base of your fingers, then roll your hand so the heel pad contacts the handle. Practice the two‑finger hold drill to retrain muscle memory. It takes about a week of daily practice to feel natural.
Can a finger grip help reduce a slice?
Yes, a proper finger grip promotes a neutral wrist position at impact, which can reduce an open clubface and therefore slice. However, you must also check hand strength (weak vs strong). If you slice, try a slightly strong lead hand (three knuckles visible) and keep the trail hand neutral.
Does a finger grip help with hand pain?
Yes, by allowing the fingers to take the pressure instead of the palm, you reduce strain on the heel pad and wrist. Many golfers with arthritis find the finger grip more comfortable because it uses smaller muscles and less force. If pain persists, consider a larger grip size and softer compound.
Conclusion: Your Next Practice Session
Let’s recap what matters:
- Grip the lead hand in the base of the fingers, not the palm, to enable proper wrist hinge.
- Only three fingers (pinky, ring, middle) of the lead hand should apply main pressure; thumb and index are light.
- The trail hand should also grip in the fingers, with a trigger finger option for advanced players.
- Choose your grip style (overlap, interlock, baseball) based on hand size and comfort, but always maintain finger placement.
The game doesn’t owe you anything – but it does reward those who get the fundamentals right. Your next practice session: spend five minutes on the two‑finger hold drill. Feel the difference in your swing and watch your ball flight transform. I’ve been playing golf for thirty‑six years, and I still start every range session with a couple of grip checks. Because if you get the grip right, everything else follows. Walk the course. You’ll understand.

Playing golf since before GPS rangefinders existed. Eddie covers the classic game — courses, technique, and the stories worth keeping.